With the model successfully completed and polished (triangulating the mesh so it’s compatible with torque, shaving unneeded faces etc) attention turned to rigging the model with a skeleton of IK joints to prepare the model for animating, and to lay out the UV Map for texturing the model. Again the group had prior experience using both of these features, so production began smoothly (though in the tutorials provided by our tutors and technician I did find several features concerning both tools that I had not known of previously).
It was during the rigging that I found problems with getting the model to move correctly. When moving the hand forward, the elbow would not bend but instead lock in a straight line and follow the hand. Also if bending the arm inward the elbow would move vertically as opposed to horizontally.

Showing the problem to Harry, he suggested redoing the rig with a bend in the elbow, which would guide the joint in deciding which way to bend during animations. Further problems when shown to our technician Charlie were found to be my fault; I was unaware of the need to orient the joints on the model or of the need to weight paint the vertices of the model. Tutorials were planned for these features, but our group was making good progress and had reached the point of using the features before they tutorials were scheduled. Charlie however kindly guided us through the process. I completed the rigging, though the weighting had to be finished off next week.
Mapping the model was also made much easier thanks to a method introduced to me by Harry. Originally I have used the “automatic mapping” feature, which though quick and effective prevents much organisation of the map. Harry’s alternative uses the “planar mapping” feature, where the mapping is done according to a specific camera that can be angled by the player, and I could select which faces of the model to map onto the UV, and I could move the camera to different angles for different faces. Though a much slower method compared to automatic mapping, it allows far greater organisation of the UV Map, and allowed me to size elements myself, making high-detail parts on the UV map larger, making painting of the texture far easier. In the case of this model, as some textures were one solid colour, Harry showed how I could make these UVs very small on the UV Map, allowing me to paint them solidly with just a small square of colour. This gave me far more room to place the higher detail parts of the map.


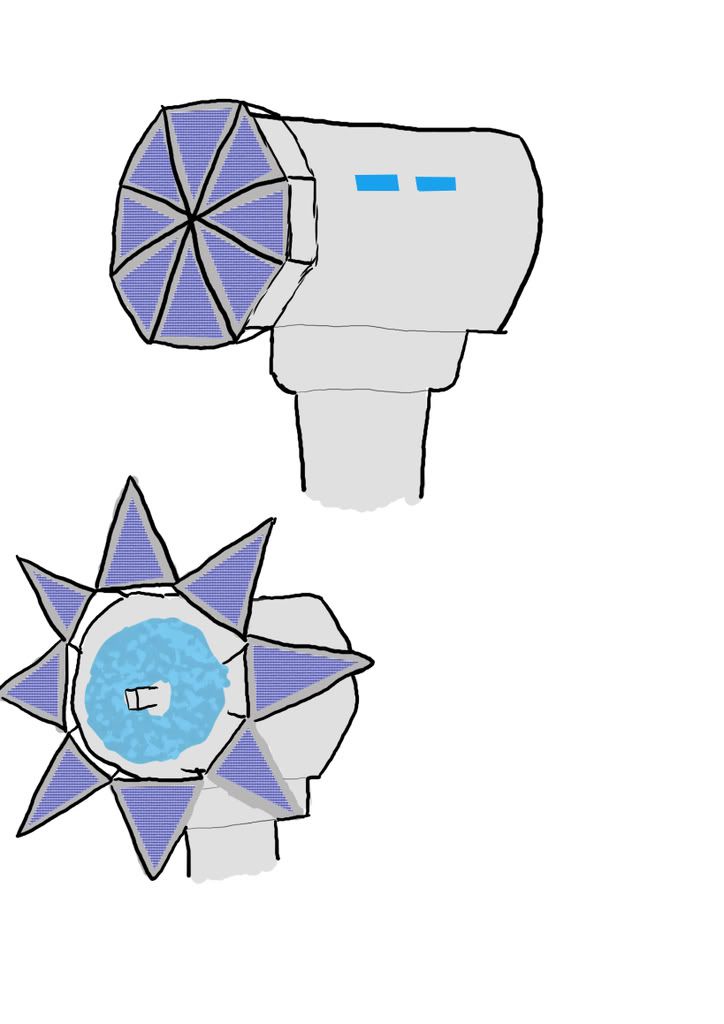
While doing this, Harry asked if I could help him brainstorming the design for the fortress weather control device for Chrono to use in the end part of the project. He showed me some ideas he had come up with, which looked good, but they all made the control device out to look like a weapon, and I put forward the idea of alternatively making it look more like it was a normal, peaceful device that could just be used like a weapon, and idea he thought might be interesting. He also wanted the weapon to have some kind of close combat tool; a chainsaw or a laser, in case ships got too close to the cannon. As it was a weather device, I suggested a high pressure water cannon (inspired by the use of such a weapon by metal gear REY in Metal Gear Solid 2).
It was during the rigging that I found problems with getting the model to move correctly. When moving the hand forward, the elbow would not bend but instead lock in a straight line and follow the hand. Also if bending the arm inward the elbow would move vertically as opposed to horizontally.

Showing the problem to Harry, he suggested redoing the rig with a bend in the elbow, which would guide the joint in deciding which way to bend during animations. Further problems when shown to our technician Charlie were found to be my fault; I was unaware of the need to orient the joints on the model or of the need to weight paint the vertices of the model. Tutorials were planned for these features, but our group was making good progress and had reached the point of using the features before they tutorials were scheduled. Charlie however kindly guided us through the process. I completed the rigging, though the weighting had to be finished off next week.
Mapping the model was also made much easier thanks to a method introduced to me by Harry. Originally I have used the “automatic mapping” feature, which though quick and effective prevents much organisation of the map. Harry’s alternative uses the “planar mapping” feature, where the mapping is done according to a specific camera that can be angled by the player, and I could select which faces of the model to map onto the UV, and I could move the camera to different angles for different faces. Though a much slower method compared to automatic mapping, it allows far greater organisation of the UV Map, and allowed me to size elements myself, making high-detail parts on the UV map larger, making painting of the texture far easier. In the case of this model, as some textures were one solid colour, Harry showed how I could make these UVs very small on the UV Map, allowing me to paint them solidly with just a small square of colour. This gave me far more room to place the higher detail parts of the map.


While doing this, Harry asked if I could help him brainstorming the design for the fortress weather control device for Chrono to use in the end part of the project. He showed me some ideas he had come up with, which looked good, but they all made the control device out to look like a weapon, and I put forward the idea of alternatively making it look more like it was a normal, peaceful device that could just be used like a weapon, and idea he thought might be interesting. He also wanted the weapon to have some kind of close combat tool; a chainsaw or a laser, in case ships got too close to the cannon. As it was a weather device, I suggested a high pressure water cannon (inspired by the use of such a weapon by metal gear REY in Metal Gear Solid 2).

The first set of designs I devised were on a similar vein to his own; a sleek, high tech look made of simple models (any complex shapes would be represented through the texture). He liked them, but he felt a more “nature-esque” design would suit the model, so we looked to flowers as a possibility. He also thought it would make sense for water to have a role in the design in some way. Though this design direction was not used in the end due to time and poly limitations the brainstorming together I’m sure help.